Implementing the DRVVM Architecture in Flutter
- Authors

- Name
- Justin Kek
- @justin_kek
- Developer @ Theodo Group
- Published on

Table of Contents
Before you continue… This article is part of a parent article (Android's Guide to App Architecture in Flutter), where concepts used in this article are discussed. If you encounter specific terminology in this article (e.g. LocalDataSource, RemoteDataSource) which you don't understand, please consult the parent document or reach out to me!
Introduction
This article is a no-frills guide to implementing the Data-Repository-View-ViewModel (DRVVM) Architecture pattern using provider, injectable, and hive.
Packages used to implement the DRVVM Architecture
Three packages are used for this architecture pattern:
What is Injectable used for?
Injectable is a dependency injection tool which is used to:
- Declare LocalDataSource as a singleton and provide it to a Repository
- Declare RemoteDataSource as a singleton and provide it to a Repository
- Declare Repository as a singleton and provide it to ViewModel classes
- Provide ViewModel classes to View classes (i.e. StatelessWidget)
What is Provider used for?
Provider is a state management framework used by ViewModel classes to share state between different components.
What is Hive used for?
Hive is a key-value database used for persistent storage on the user’s device.
Guided Code Examples of the DRVVM Architecture
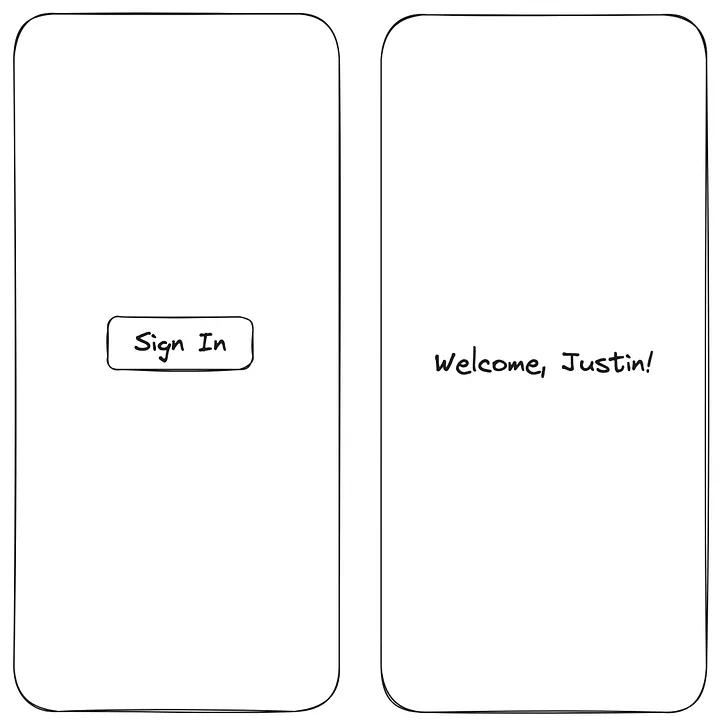
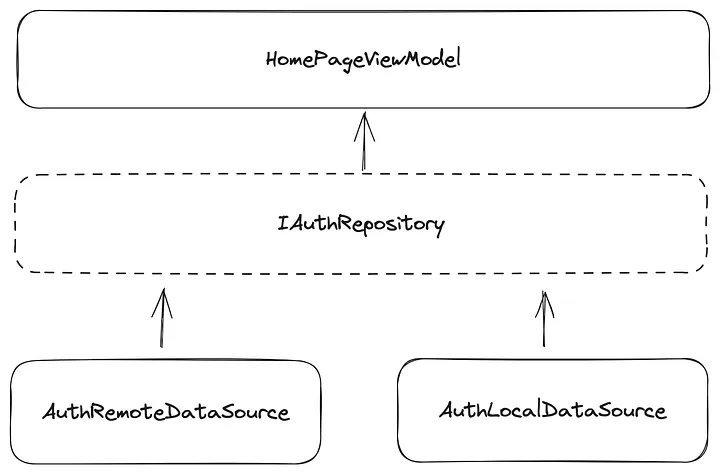
Let’s walk through an example together; assume that we wanted to implement a HomePage which tells the user whether they are signed in or not, and if not, provides the user with a sign-in button.
Firstly, implementing the Data Layer

In the Data layer, we will need to create a RemoteDataSource to interface with an arbitrary remote authentication provider, and a LocalDataSource to interface with the device’s local storage.
In this case, I used Firebase as the remote authentication provider, which has its built-in signIn() method that returns a User credential.
There are two steps to creating the RemoteDataSource:
- Create a singleton
AuthRemoteDataSource - Expose a
signIn()method for use by the Repository that returns theUserobject
class AuthRemoteDataSource {
Future<User> signIn() async {
return await FirebaseAuth.instance.signInAnonymously();
}
Future<User> get user async {
return await FirebaseAuth.instance.currentUser;
}
...
}
Next, we create a LocalDataSource to store the User object so that we can access it even in poor network connectivity. The reason why we need persistent storage on the user’s device is so that the User object is still stored even when the app is terminated. In this case, I’ve used hive – here are the steps:
- Create a singleton AuthLocalDataSource
- Provide a getter and setter for the User object
- Store and retrieve the User object from persistent storage
class AuthLocalDataSource {
/// Get User object from persistent storage
Future<User> get user async {
final authObject = (await Hive.openBox(‘foo’)).getAt(0);
final _user = authObject.user;
if (_user == null) {
throw StateError(‘Tried to get user when it was null’);
}
return _user!;
}
/// Set User object in persistent storage
setUser(User? _) async {
var authObject = (await Hive.openBox(‘foo’)).getAt(0);
authObject.user = _;
authObject.save();
}
/// User is signedIn if the user object in storage is not null
bool get signedIn => user != null;
}
/// Configure storage of objects in persistent storage using Hive
(typeId: 0)
class AuthObject extends HiveObject {
(0)
User user;
}
With the Data layer set up, we can now implement the Repository layer.
Implementing the Repository Layer to resolve local and remote data sources
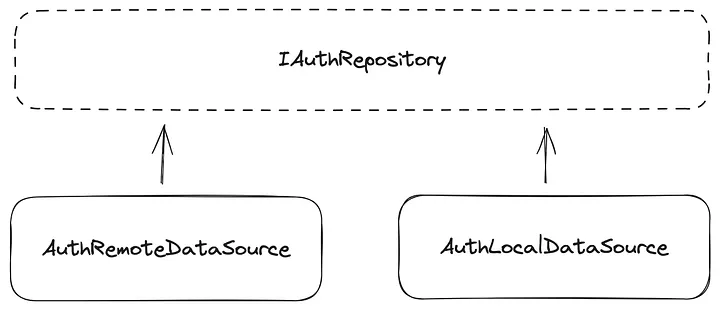
We first define the interface IAuthRepository, with the methods we intend to expose:
- A
signedIngetter, - A
Userobject getter, and - A
signIncallback
abstract class IAuthRepository {

  bool get signedIn;

  User get user;

  Future<bool> signIn();
}
We then implement the interface with the concrete class AuthRepository.
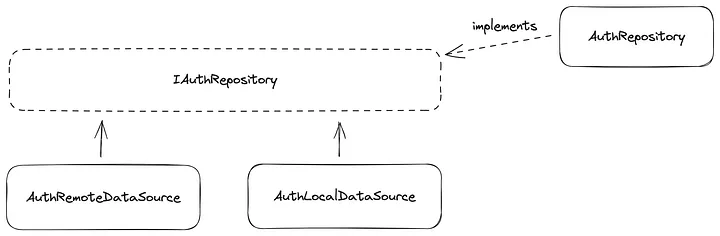
A few things happening here:
- We need to annotate the concrete class as a singleton, and which interface it implements.
- For the
signedIngetter, we are always checking the LocalDataSource to see if the user has been signed in so that the app will work quickly even in poor network connectivity - Similarly, for the
usergetter, we try to get theUserobject from LocalDataSource first, and if that fails, we can get it from the remote data source - Lastly, for the
signIn()method, we try to call theauthRemoteDataSource.signIn()method, and set theUserobject in LocalDataSource
(as: IAuthRepository)
class AuthRepository implements IAuthRepository {
AuthRepository(this._authLocalDataSource, this._authRemoteDataSource);
final AuthLocalDataSource _authLocalDataSource;
final AuthRemoteDataSource _authRemoteDataSource;
bool get signedIn => _authLocalDataSource.signedIn;
User get user {
try {
return _authLocalDataSource.user ?? _authRemoteDataSource.user;
} catch (e) {
throw Exception('Failed to retrieve user!');
}
}
Future<void> signIn() async {
try {
final user = await _authRemoteDataSource.signIn();
_authLocalDataSource.setUser(user);
} catch (e) {
throw Exception('Sign in failed!');
}
}
}
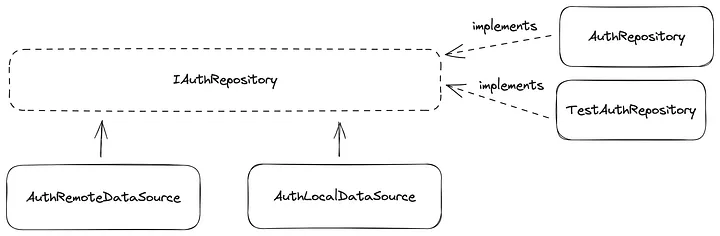
This tells the dependency injection tool which class it should provide at runtime. This allows us to inject different interface implementations easily, e.g. if we were to create TestAuthRepository implements IAuthRepository, we can run integration or e2e tests without changing or mocking the View and ViewModel layers.
Implementing the ViewModel Layer to abstract business logic away from the View
We can now get to setting up the business logic and state required to render the view. Since we just want to tell the user whether or not they are signed in, we only need two getters:
- A getter to retrieve the username from the User object
- A getter to check whether or not the user is signed in
class HomePageViewModel extends ChangeNotifier {
HomePageViewModel(this._authRepository);
final IAuthRepository _authRepository;
String get username => _authRepository.user.username;
bool get signedIn => _authRepository.signedIn;
void signIn() async {
authRepository.signIn();
}
}
Note that to inject AuthRepository using injectable, you need to:
- Specify IAuthRepository as a member of HomePageViewModel
- Add that member as a constructor argument
- Specify HomePageViewModel as an injectable class
This way, when you get HomePageViewModel using injectable, it automatically resolves and provides HomePageViewModel’s dependencies for you.
And finally the View Layer…

Finally, we just need to create a stateless View component and provide the required ViewModel above the View component.
The following HomePage View component shows “Welcome {username}” if the user is signed in, and “Please sign in again” otherwise.
class HomePage extends StatelessWidget {
const HomePage(this.viewModel, {super.key});
final HomePageViewModel viewModel;
Widget build(BuildContext context) {
return Scaffold(
...
body: Center(child:
Column(
children: [
if (!this.viewModel.signedIn)
Text('Welcome, ${this.viewModel.username}!')
if (!this.viewModel.signedIn)
TextButton(‘Sign In’, onTap: this.viewModel.signIn()),
]
)
)
),
);
}
}
Note that the ViewModel is passed to the HomePage via constructor injection. This allows you to easily perform widget testing by providing a mock ViewModel with your test case values.
The last thing we need to do is just provide the ViewModel above the View:
void main() => runApp(
MultiProvider(
providers: [
ChangeNotifierProvider(create: (context) => getIt<HomePageViewModel>()),
],
child: const MyApp()
),
);
class MyApp extends StatelessWidget {
Widget build(BuildContext context) {
return MaterialApp(
...
home: HomePage(getIt<HomePageViewModel>()),
);
}
}
And we’re done!
Conclusion
In this article, we’ve learned how to implement the Data-Repository-ViewModel-View layer architecture using provider, injectable and hive.
The key takeaways are:
- provider is used in the ViewModel layer
- hive is used as the LocalDataSource
- injectable is used as a dependency injection tool for DataSources, Repositories and ViewModels
If you have further questions feel free to reach out or leave a comment below!