I couldn't wait for Impeller, so I built a 3D game with Flutter and Flame
- Authors

- Name
- Justin Kek
- @justin_kek
- Developer @ Theodo Group
- Published on

Okay fine it's not really 3D - here's how we built a pseudo-3D game with Flame for Flutter's Global Gamer Challenge 2024!
What were we trying to build?
Every month at Theodo's London office, we have a mobile guild hackathon where we work on a project of our choice. As the Flutter aficionado in the team, I've been looking for ways to get the React Native and Native peeps to dip their toes in the Flutter pool.
As if by godsend, Flutter's sustainability-themed Global Gamer Challenge was announced, and I knew this was the perfect opportunity to get the team to build a game using Flutter.
After a brainstorming session and a few pizzas, we had a winning idea: To build the timeless classic Paper Toss, but instead of throwing paper, you throw recyclable items into the recycling bin.
What was the problem?
The biggest problem here is the game's 3D aspect, both in visuals and logic (e.g. need to check whether the item thrown has gone into the bin).
Flutter's most mature game development library, Flame, is a 2D game engine. It's great for 2D collision detection and rendering, but we needed a 3D game engine to build our game.
Consequently, we looked at the third-party Unity library for Flutter, but we were concerned about the plugin's reliability and the learning curve for the team.
Waiting for Impeller was also a non-option since the deadline for the challenge was in two months and we wanted to get started as soon as possible.
In consideration of these factors, we gave Flame a second look and decided to build a pseudo-3D game with it.
How did we make a 2D game engine look 3D?
After another brainstorming session, we came up with a plan to make Flame's 2D framework look 3D. There were two main steps to our plan:
- Creating two separate coordinate systems
- Rendering 3D objects as 2D assets
Creating two separate coordinate systems with an interface
We realised that we would need to distinguish into two coordinate systems, and create an interface between them:
- The 3D spatial coordinate system, with units in metres, was used to track the position of the items in the game, as well as the bin. It is used for the game's logic, e.g. checking whether the item has gone into the bin, or if it has hit the bin's rim.
- The 2D rendering coordinate system, with units in pixels, was used to render the game on the screen. This is the coordinate system that Flame uses.
- The mapping interface is used to convert values between the two coordinate systems, i.e. given a 3D spatial coordinate, where should it be rendered on the screen?
With these concepts in place, we started building the game.
The 3D spatial coordinate system
The spatial coordinate system, EcoToss3DSpace, describes the 3D space in which the player's object is thrown.
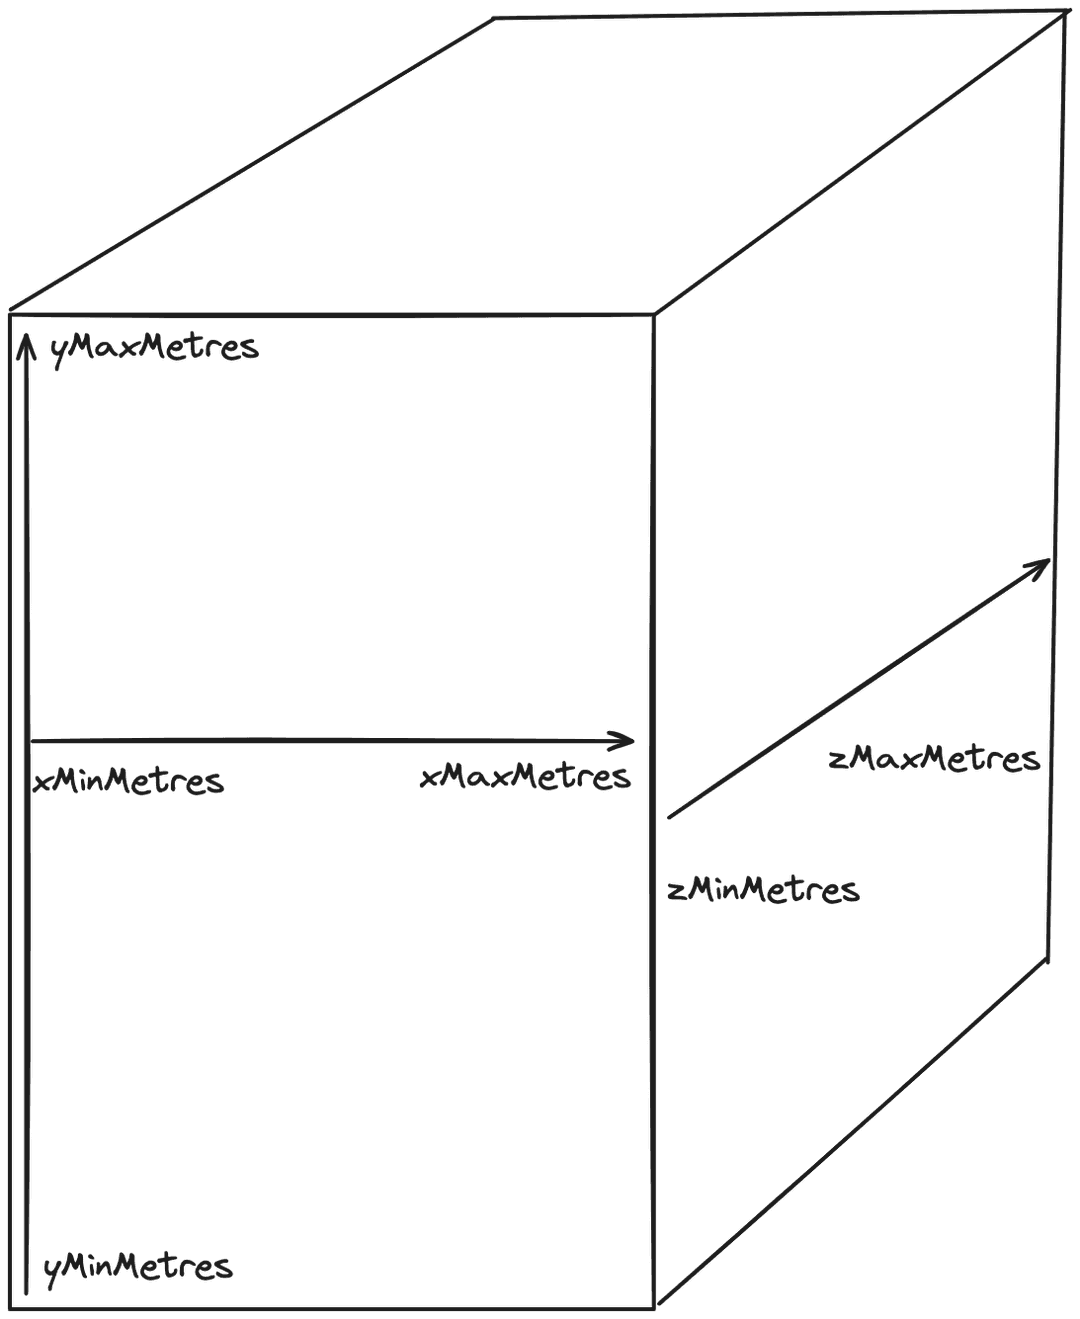
- The object travels into the screen from
zMinMetrestozMaxMetres. - The floor is at
yMinMetresand the ceiling is atyMaxMetres. - The left wall is at
xMinMetresand the right wall is atxMaxMetres.
abstract class EcoToss3DSpace {
    static const xMinMetres = 0.0;
    static const xMaxMetres = 2.0;
    static double get xMidMetres => (xMaxMetres - xMinMetres) / 2;

    static const yMinMetres = 0.0;
    static const yMaxMetres = 4.0;
    static double get yMidMetres => (yMaxMetres - yMinMetres) / 2;

    static const zMinMetres = 0.0;
    static const zMaxMetres = 4.0;
    static double get zMidMetres => (zMaxMetres - zMinMetres) / 2;
}
With this, we can start describing objects in 3D space, e.g. the bin, the items, and the player's object.
The 2D rendering coordinate system
The rendering coordinate system is what is used by Flame to render the game on the screen. It is a 2D coordinate system with units in pixels.
We initialise this in the EcoTossPositioning class, which also contains the interface for converting between the two coordinate systems.
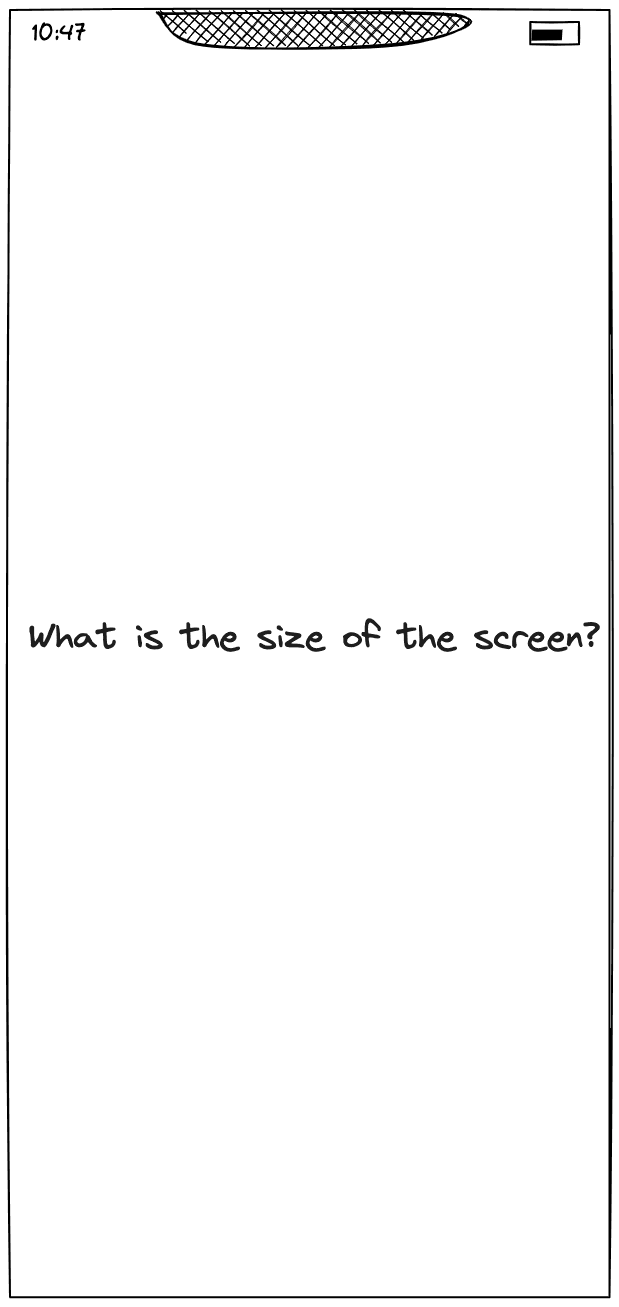
The first thing we do is to set the canvas size, which is the size of the screen on which the game is being rendered.
abstract class EcoTossPositioning {
    static void setCanvasSize(double height, double width) {
        _height = height;
        _width = width;
    }

    static double? height;
    static double? width;

    static double get leftX => -width! / 2;

    static double get rightX => width! / 2

    static double get topY => -height! / 2;

    static double get bottomY => height! / 2;
    ...
}
By calling setCanvasSize with the height and width of the screen, we can then figure out the pixel coordinate of each screen edge (e.g. leftX, rightX), so that our 3D space can be mapped to the 2D limits.
The 3D to 2D interface

To map 3D spatial coordinates to 2D rendering coordinates, we create the xyzMetresToXyPixels method in the EcoTossPositioning class. This method takes a 3D spatial coordinate and returns the corresponding 2D rendering coordinate.
Before we get that, we need to calculate the number of pixels per metre in the x, y, and z axes. Since we are fixing the orientation of the game to be vertical, we know that the width will always be shorter than the height. Hence, the limiting factor for the number of pixels per metre will be the width of the screen, and we can calculate the number of pixels per metre as follows:
abstract class EcoTossPositioning {
    ...
    static double get xyzPixelsPerMetre =>
        width / (EcoToss3DSpace.xMaxMetres - EcoToss3DSpace.xMinMetres);
    ...
}
This allows us to convert any metres to pixels by using the following formula.
With this, we have the foundation to start mapping 3D spatial coordinates to 2D rendering coordinates with the xyzMetresToXyPixels function.
Mapping the x spatial coordinate in 3D space to the x pixel coordinate is straightforward, as the only spatial coordinate that affects the x pixel coordinate is the x spatial coordinate.
abstract class EcoTossPositioning {
    ...
    static Vector2 xyzMetresToXyPixels(Vector3 xyz) {
        final xPixels = _xPositionMetresToPixels(xyz.x);
        final yPixels = ...
        return Vector2(xPixels, yPixels);
    }

    static double _xPositionMetresToPixels(double xMetres) {
        final distanceFromMidMetres = xMetres - EcoToss3DSpace.xMidMetres;
        return distanceFromMidMetres * xyzPixelsPerMetre;
    }
    ...
}
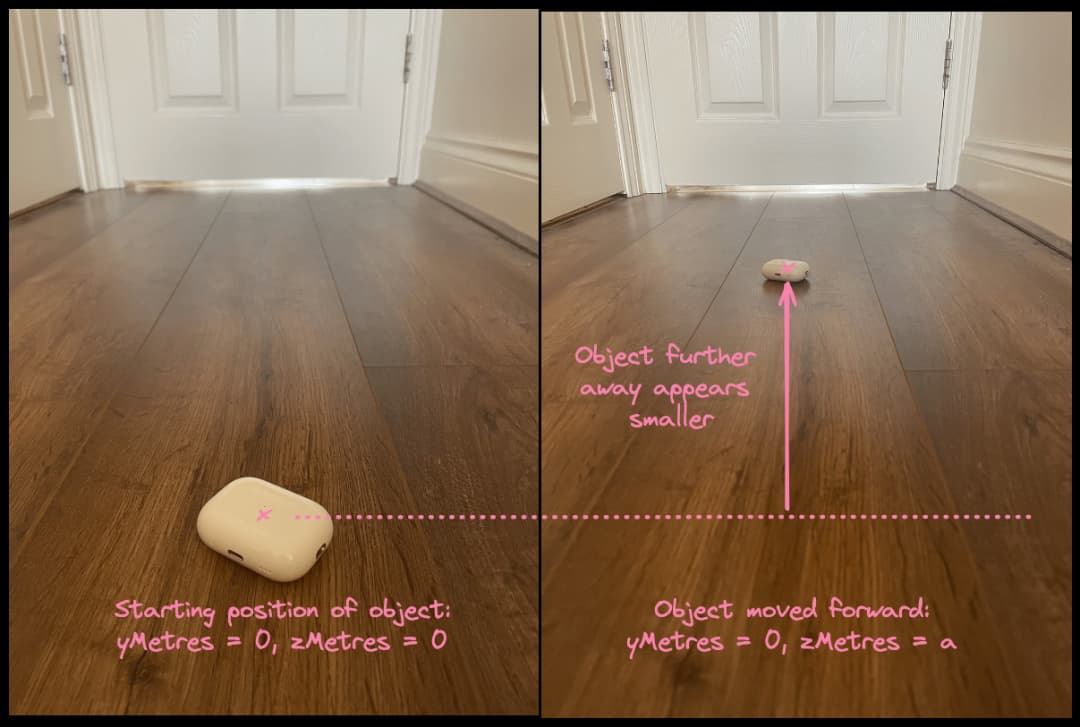
However, calculating the y-pixel coordinate is a bit more complicated, as it is affected by both the y and z spatial coordinates. To visualise this, see the following images.
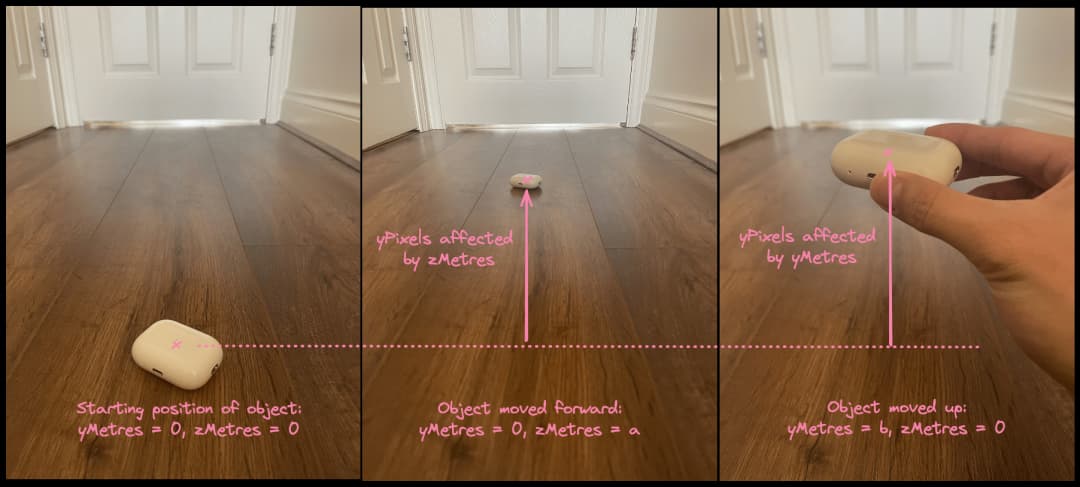
To replicate this behaviour, we calculate the y pixel coordinate as the sum of the y pixel coordinate from the y spatial coordinate and the y pixel coordinate from the z spatial coordinate.
abstract class EcoTossPositioning {
    ...
    static Vector2 xyzMetresToXyPixels(Vector3 xyz) {
        final xPixels = _xPositionMetresToPixels(xyz.x);
        final yPixelsFromYMetres = _yPositionMetresToPixels(xyz.y);
        final yPixelsFromZMetres = _zPositionMetresToPixelsRelativeToY(xyz.z);
        final yPixels = yPixelsFromYMetres + yPixelsFromZMetres;
        return Vector2(xPixels, yPixels);
    }
    ...
}
Et voila! We now have a way to map 3D spatial coordinates to 2D rendering coordinates.
The last missing piece of the puzzle is to scale the size of the object as it moves further away.
This is done by scaling the object's size by the ratio of the object's z spatial coordinate to the maximum z spatial coordinate.
abstract class EcoTossPositioning {
    ...
    const scaleStart = 3.0;
    const scaleEnd = 1.0;

    const scaleRate = (scaleStart - scaleEnd) /
        (EcoToss3DSpace.zMaxMetres - EcoToss3DSpace.zMinMetres);

    double getScaleFactor(double zPositionMetres) {
        return scaleStart -
            (scaleRate * (zPositionMetres - EcoToss3DSpace.zMinMetres));
    }
}
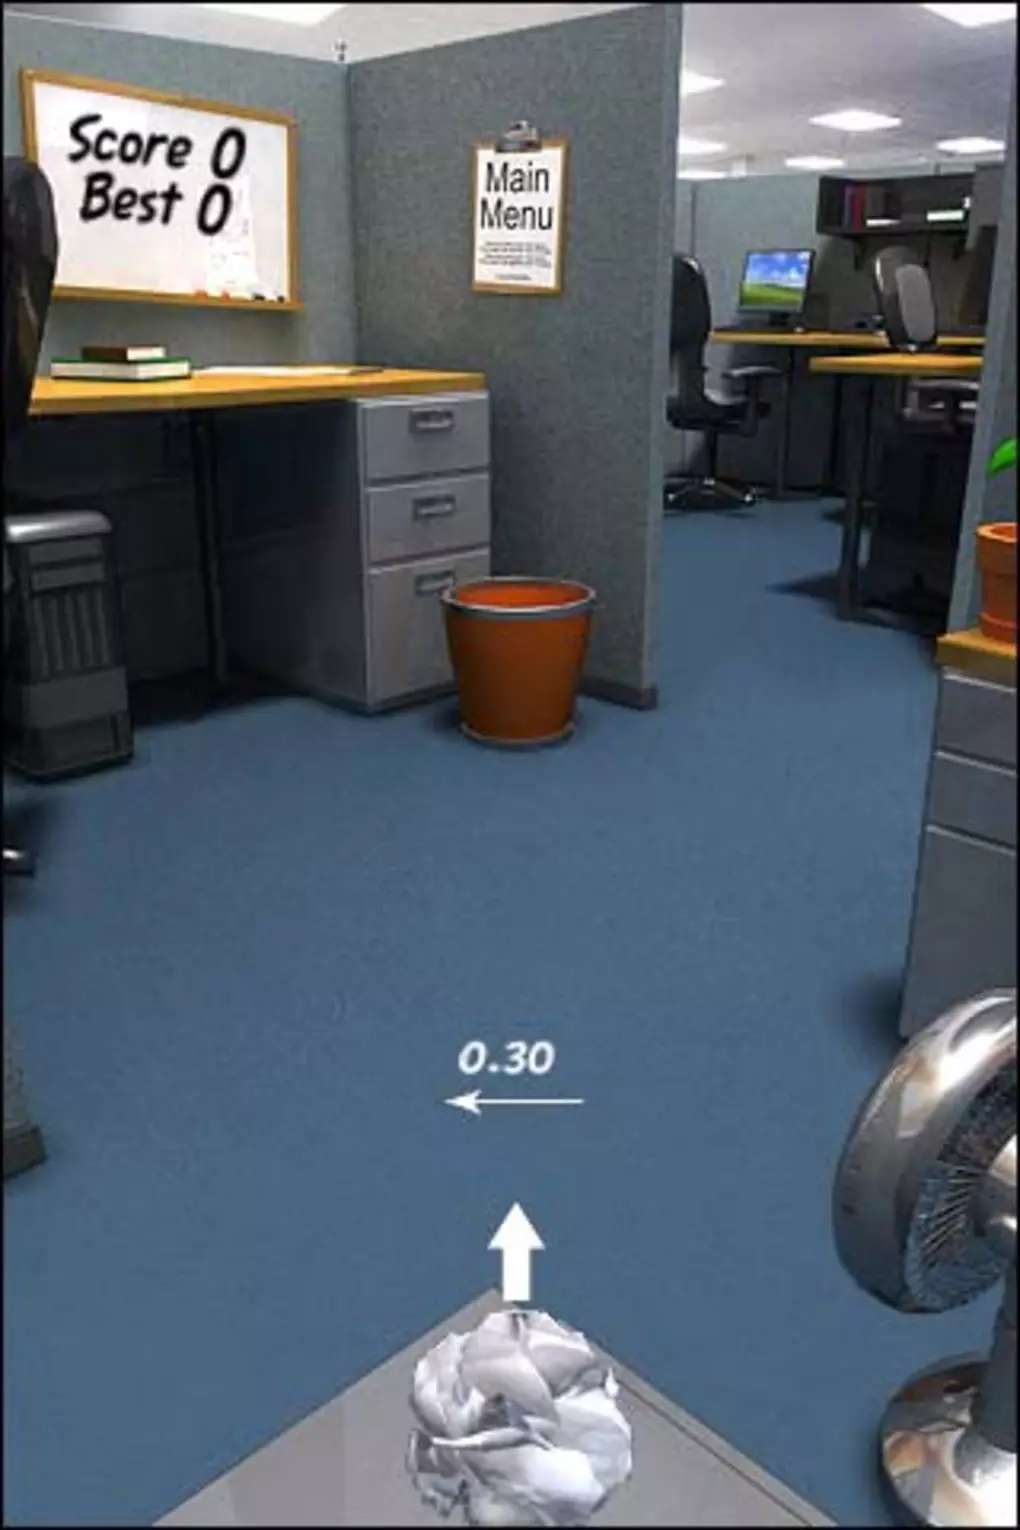
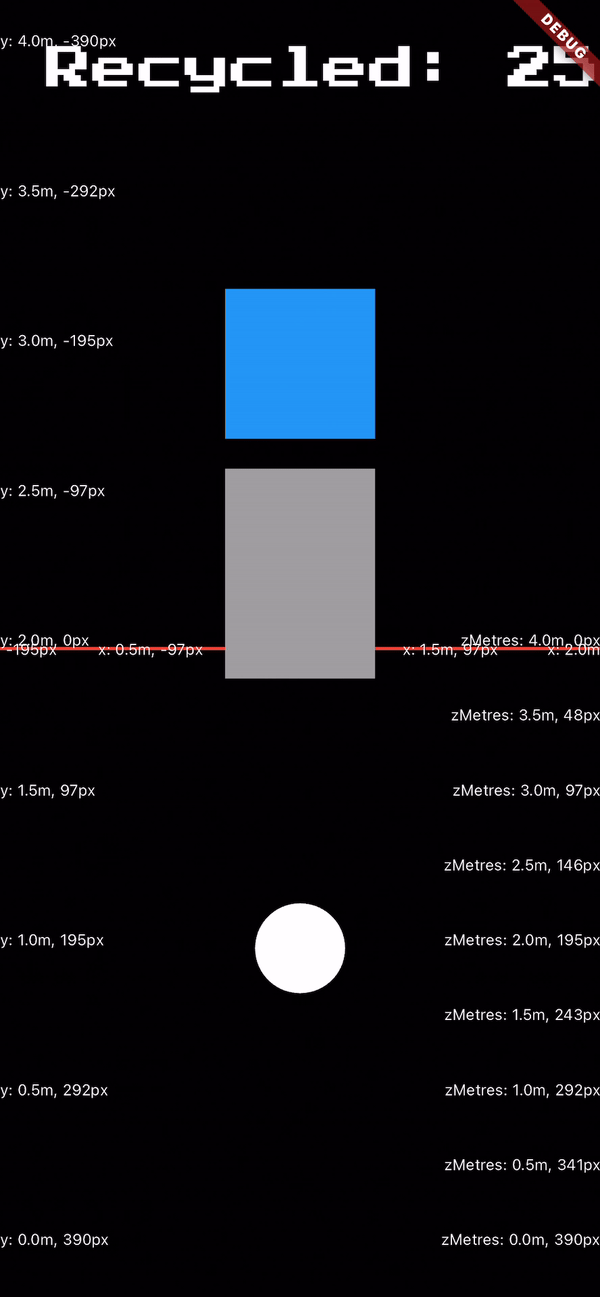
With that, we now have a working interface to map 3D spatial coordinates to 2D rendering coordinates! Here's what it looked like at that stage.
Rendering 3D objects as 2D assets
The next hurdle was getting the assets to look more 3D. This boils down to the consistency of the lighting, shadows, art styles, and the perspective of the assets. OpenGameArt assets were not cutting it for us anymore, so we decided to create custom assets.
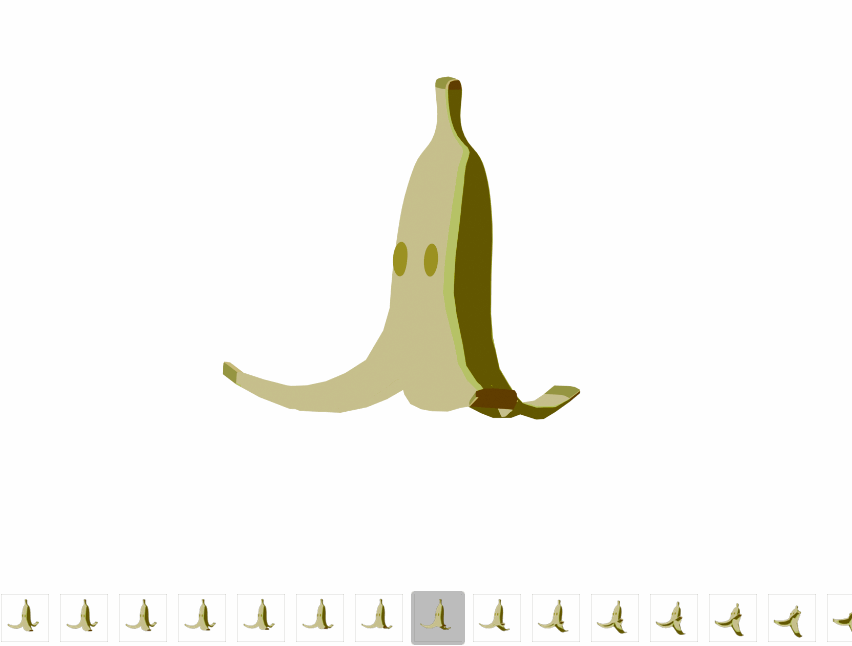
We used Blendr to create 3D models, applied layers to achieve the desired art style, and then rendered the models to 2D assets from the same perspective, achieving the desired lighting, shadows and perspectives.
For the throwable items, we rendered scenes of the items spinning, generating a sequence of images that we could use to animate the items with Flame's SpriteAnimationComponent.
Without further ado -
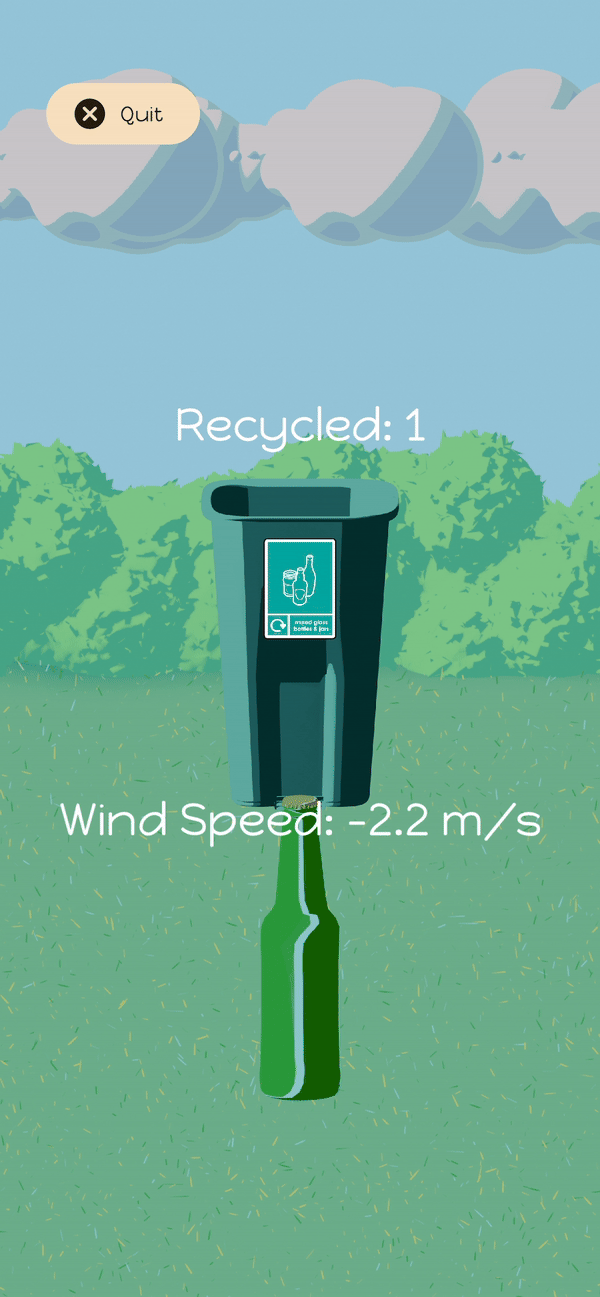
The Final Product
We're proud to present EcoToss, the pseudo-3D game we built for Flutter's Global Gamer Challenge! We're currently in beta testing but will be releasing the game on Android and iOS soon.
Learnings
We've learned a lot from building this game, here are our key points!
- Flame is versatile: We were able to build a pseudo-3D game with Flame, despite it being a 2D game engine. This is a testament to the versatility of the library.
- Converting 3D space to 2D pixels: We learned how to map 3D spatial coordinates to 2D rendering coordinates, and how to scale the size of objects as they move further away. We oversimplified a lot of the vector transformations involved with realistic perspective rendering, but we found that the linear transformations discussed in this article were sufficient for our game.
- Implementing 3D logic in a 2D game engine is hard: You can't use Flame's collision detection, since it's 2D. We had to implement custom collision detection logic, which was a bit of a headache.
If I were to build another Flutter game, here is the key question I would ask:
- Does the game have 3D logic? If so, I would consider learning Unity (see Wallace & Gromit AR Game built in Flutter x Unity), or waiting for Impeller to be released. If not, Flame is great!
That sums it up! If you want to learn more about how we built Eco Toss, feel free to reach out to me on LinkedIn!
Special thanks to Sofia for the amazing art style and 3D models, Michael and Rohan for their support on ideation and development!